Autocodes – How Cashmanager RURAL can save you time
Autocodes is a process where you can automatically code imported transactions either from your bank or trader. You can assign an Autocode a search text, category, extended code, enterprise (optional) and notes. An Autocode must have a search text and a category code. An Autocode searches the other party field, the reference field and the note field for the corresponding text and then enters the relevant codes and notes into the transaction.
Keywords (earlier Cashmanager RURAL versions)
Autocodes is a process that has replaced Keywords. Originally a keyword was set for each other party, so that when you selected that other party during transaction entry, the category and extended codes were populated. The intent with Autocoding is to uncouple other party from the keyword process so that Autocodes can be used which are product related rather than other party related.
If you use Keywords
Your existing Keywords will be converted to Autocodes. Your Keyword becomes the search text criteria and any category and extended codes are shifted to the Autocodes category and extended codes. The note will default to <use imported note>. If you have an existing keyword and a category or extended code has not been allocated, then that keyword will not be converted as an Autocode.
To setup an Autocode
From the Transaction screen, click the Setup menu and select Autocoding. A screen similar to below will appear.
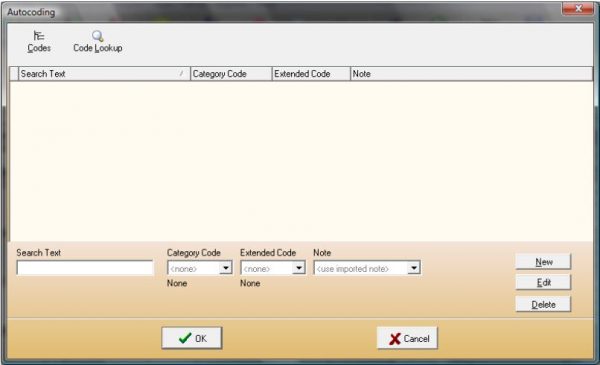
- Click the New button or right click with your mouse and select New. The bottom part of the screen will turn blue, ready for you to enter your information.
- Enter the Search Text.
The search text can be one or more words. The more detail that is entered into the search text the easier it is for Cashmanager RURAL to autocode. - Select a Category code, you can either type this if you know it, or select it from the dropdown list.
- Select an Extended Code, you can either type this if you know it, or select it from the dropdown list.
- Select a Note, you can choose from:
Use imported note – this leaves the note as it appears on the import. This sometimes has more detail and maybe more relevant than the code notes.
Category code note – this uses the category code description. Extended code note – this uses the extended code description; or
Type your own unique note. - Select an Enterprise (only appears if you have enterprises set up).
To Setup Autocodes while Importing your Bank Statement
From the Load Bank Transactions screen click on the Autocoding button from the toolbar.

Important: If you are highlighted on an already coded line of your bank statement, then when you click the New button from the Autocoding screen it will automatically add that line as an autocode, you will need to select which note you want to use.
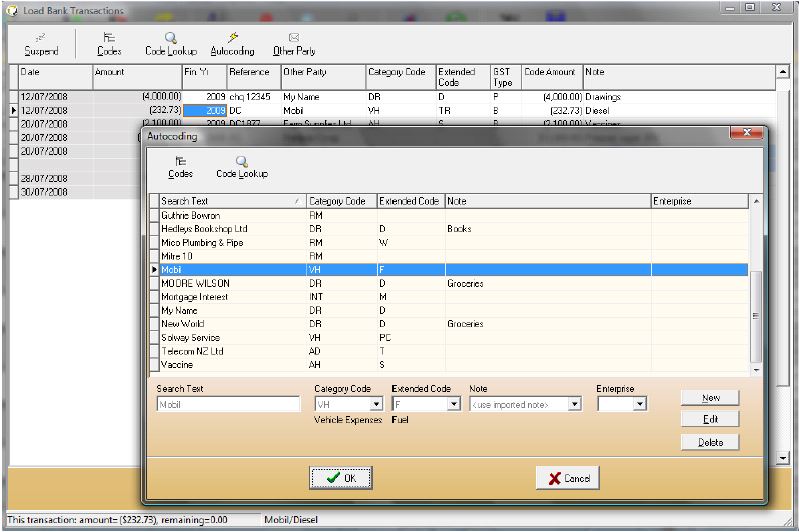
If you do not wish to add the already coded line of your bank statement as an Autocode, just click the Delete button.
You can continue to add as many Autocodes as you like by clicking the New button. Once you have finished and clicked on the OK button, a screen will appear asking you if you would like to reapply automatic coding?
If you click yes, your transactions will use the Autocodes. If you click no, the load bank transactions screen appears and you will have to code the items individually.
Note: If you have already coded a line on the load bank transactions screen, and then setup a new Autocode for the same line but using different codes, the reapply automatic coding does not work. If you want to alter the coded line, you will need to manually change it.
To Setup Autocodes while Importing your Trader Statement
Click the Autocodes button from the transaction, or click the Setup menu and select ![]() Autocoding.
Autocoding.
Important: If you are highlighted on an already coded line of your trader statement when you click the new button from the Autocoding screen, it will automatically add that line as an autocode. You will need to select which note you want to use.
If you do not wish to add the already coded line of your trader statement as an Autocode then just click the Delete button.
You can continue to add as many Autocodes as you like by clicking the New button. Once you have finished and clicked on the OK button, a screen will appear asking you if you would like to reapply automatic coding?
If you click yes, then your transactions will use the Autocodes. If you click no, the Transactions screen will appear and you will have to code the items individually.
Note: If you have already coded a line in the Transaction screen, and then setup a new Autocode for the same line but using different codes, then reapply automatic coding does not work. If you want to alter the coded line then you will need to manually change it.
To Edit an Autocode
- From the Autocode screen select the Autocode you want to edit.
- Click the Edit button or right click with your mouse and select Edit. The screen will turn blue to allow you to change the Autocode.
- Click OK to save the changes and close the Autocode screen.
To Delete an Autocode
1. From the Autocode screen select the Autocode you want to delete.
2. Click the Delete button or right click with your mouse and select Delete.
3. Click OK to save the changes and close the Autocode screen.
![]()

